
Luz is a C++20 Path Tracer developed from scratch with zero third-party dependencies.
It supports Monte Carlo path tracing, global illumination, BVH acceleration, adaptive sampling, denoising, atmospheric scattering, custom scene files, and a Blender-to-Luz exporter.


- Monte Carlo path tracing
- Global illumination
- Multithreaded CPU rendering
- Adaptive sampling
- Denoiser (NFOR-style)
- Spheres, planes, rectangles, triangles, cubes, volumes, and OBJ meshes
- Lambertian, metal, dielectric, emissive, and isotropic materials
- Area, point, sphere and directional lights
- Custom
.luzscene files - .blend to .luz converter
- Fully customizable render parameters via CLI or scene file
- Importance sampling with PDFs
- BVH acceleration, including packed mesh BVHs with binned SAH construction and near-first traversal
- Atmospheric simulation w/ scattering
- Depth of field, antialiasing, exposure, contrast, tone mapping, gamma correction, and bloom
- BMP and TIFF output
- Deterministic benchmark harness with render, denoise, post-process, and score breakdowns
- C++20 compiler
- Make or CMake 3.16+
- Python 3, only for optional tools/scripts
Build with the Makefile:
Render a bundled example scene:
./Luz --file examples/scenes/blender_monkey.luz --samples 50 --resolution 300x300
The default output is render.bmp. Scene files can set outputfilename=..., and the CLI can override common render settings.
Run the test suite:
Luz includes deterministic benchmarks for render, denoise, post-process, and
overall score comparisons.
make benchmark BENCH_CPUS=1 BENCH_THREADS=1 > before.csv
make benchmark BENCH_CPUS=1 BENCH_THREADS=1 > after.csv
make benchmark-compare BEFORE=before.csv AFTER=after.csv
For details, see docs/benchmarks.md.
A CMake build is also available:
cmake -S . -B build
cmake --build build
ctest --test-dir build
Supported platforms:
On macOS and Linux, the Makefile is the primary path. On Windows, use CMake with
MSVC or the MinGW-based Makefile target:
WSL is also supported as a Linux build environment.
Release builds are tuned for the machine doing the build by default. The
Makefile enables -O3, native CPU tuning with -march=native, and link-time
optimization with -flto. It also enables a fast floating-point mode where the
compiler/platform supports it. CMake uses the same release intent: -O3, native
CPU tuning, and interprocedural optimization/LTO when supported.
These defaults produce faster local renders, but binaries built with
-march=native may not run on older or different CPUs, and LTO can expose
toolchain-specific linker issues. If you hit an illegal-instruction crash,
linker error, or need a more portable binary, disable the aggressive options and
rebuild from clean objects:
make clean
make NATIVE=0 LTO=0
For CMake builds, configure with the optimization toggles off:
cmake -S . -B build -DLUZ_NATIVE_OPTIMIZATIONS=OFF -DLUZ_ENABLE_LTO=OFF
cmake --build build --clean-first
Usage: ./Luz [options]

  -f, --file PATH             Load a .luz scene file
  -r, --resolution WxH        Override render resolution
  -s, --samples N             Override samples per pixel
  --adaptive [true|false]     Enable adaptive per-pixel sampling
  --no-adaptive               Disable adaptive sampling
  --adaptive-min-samples N    Minimum samples before adaptive stopping
  --adaptive-threshold F      Relative adaptive noise threshold
  --adaptive-check-interval N Adaptive convergence check interval
  -mlb, --maxLightBounces N   Override maximum light bounces
      --max-light-bounces N   Alias for --maxLightBounces
  -t, --threads N             Render with N worker threads
  --seed N                    Seed random sampling
  --gamma true|false          Toggle gamma correction
  -tm, --tonemapping true|false  Toggle tone mapping
  --bloom true|false          Toggle bloom
  --exposure EV              Exposure compensation in stops
  --contrast F               Display contrast multiplier
  --denoise [true|false]      Write a denoised companion render
  --no-denoise                Disable denoising
  -o, --output PATH           Override render output path
  --denoise-output PATH       Override denoised output path
  --render-times              Write renderTime.bmp
  --benchmark                 Run the built-in benchmark scene
  --benchmark-case NAME       Benchmark case: default, many-objects, mesh-bvh, diffuse, postprocess, atmosphere, lights, emissive-geometry, primitives-materials, volumes, obj-mesh
--adaptive treats --samples as the maximum samples per pixel. Each pixel
uses a progressive per-pixel sample sequence, renders at least
--adaptive-min-samples, then periodically checks luminance and RGB confidence
intervals. Very dark pixels use a conservative minimum before they can stop, so
rare light contributions are less likely to be mistaken for converged black.
Lower thresholds keep more detail and cost more time. For final renders, start
with a high max sample count and tune with values like:
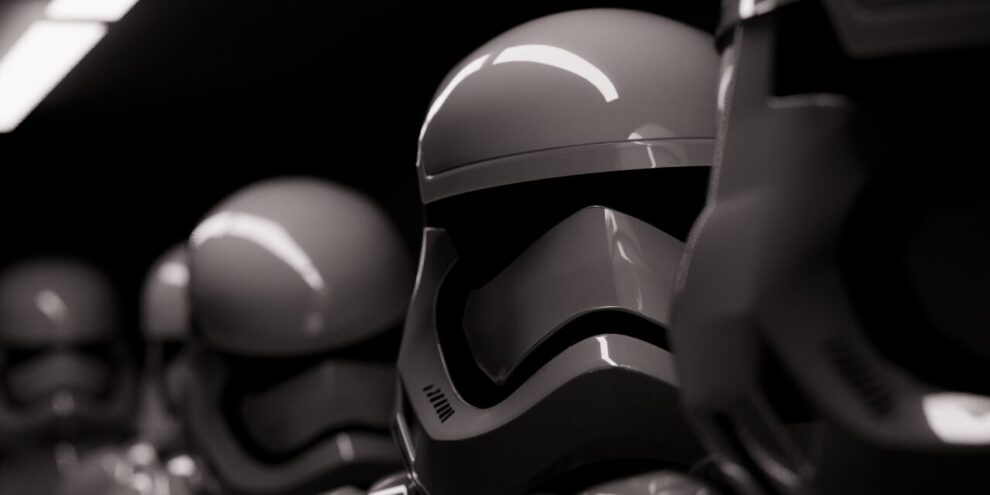
./Luz --file exports/stormtroopers.luz --samples 4096 --adaptive --adaptive-min-samples 512 --adaptive-check-interval 64 --adaptive-threshold 0.005 --denoise
--denoise enables Luz’s NFOR-style feature-buffer denoiser and writes a
separate companion image. By default, render.bmp becomes
render_denoised.bmp; use --denoise-output PATH to choose the exact path.
The denoiser has no hard minimum resolution or sample count, but it needs enough
signal to estimate useful color and feature statistics. One sample per pixel is
mainly a stress test: there is no per-pixel variance estimate, so the denoised
image can look almost unchanged or can smooth the wrong details. Use at least a
few samples per pixel for previews, and prefer roughly 16+ samples per pixel
when judging denoiser quality. Very low resolutions also make evaluation
misleading because each local filter window covers too much of the image.
Example scenes live in examples/scenes/. Mesh assets live in assets/objects/. The scene-file format is documented in docs/scene-files.md.
Object paths in .luz files are resolved relative to the scene file first, then relative to the current working directory, then under assets/objects/. This means examples/scenes/blender_monkey.luz can reference ../../assets/objects/blender_monkey.obj and still run from the repository root.
OBJ meshes can also be offset and assigned a scene material:
obj=mesh.obj,(x,y,z),material[
metal=(0.8,0.8,0.8),0.1
]
Blender scenes can be exported through Blender’s Python API:
"/Applications/Blender.app/Contents/MacOS/Blender" -b scene.blend --python tools/blender_export_luz.py -- --output exports/scene.luz
./Luz --file exports/scene.luz --threads 8
The exporter writes a .luz file plus OBJ meshes. Usage and current fidelity
limits are documented in docs/blender-exporter.md.
include/luz/       Public headers
src/core/          Math, geometry, materials, image, and sampling code
src/renderer/      Rendering implementation
src/scene/         Scene model and scene helpers
src/io/            Scene-file, OBJ, BMP, and TIFF loading/writing
src/cli/           Command-line entry point and flags
examples/scenes/   Example .luz scene files
assets/objects/    OBJ assets used by examples
docs/images/       Compressed showcase images
tools/             Export and utility scripts
tests/             Standard-library-only test program
docker/            Benchmark container


Special thanks to the Ray Tracing in One Weekend book series. It was a great source of inspiration and information during a big part of the development of Luz, specially since those were times before AI.
Stormtrooper Scene by @ScottGraham on BlendSwap.
Bust Statue by @geoffreymarchal on BlendSwap.
MIT. See LICENSE.
Add Comment